Despite what I've said in the previous blog entry, the progress pics for my self build #2 are now on my other blog ...
which can be found here
As will be progress pics for self build #3, self build #4 and self build #5.
If you're now wondering where I'll put the pics for self build #6 ... I really don't know as I haven't planned beyond the end of the month.
(that's a joke - it'll take me at least a month to build a guitar!)
So, the £100 guitar challenge is now complete, the blog is finished, and transmissions will now end.
Wednesday, April 23, 2008
Tuesday, April 22, 2008
Fame?
It's looks as if we may get famous ... one of the guitar mags might run some sort of feature on the challenge.
It would be a bit of a boring article if the article just featured those who successfully completed the challenge (ie the 2 of us - hi Tim!), so hopefully those many nearly-guitars will also get featured.
We're also discussing (on the forum) whether, how and when to repeat the challenge later in the year. With a bit more preparation time and advance notice, we'll hopefully get some more successful completions.
Meanwhile, I've started another build without being challenged.
There ought to be some sort of "warning: guitar building can be addictive" notice somewhere.
I'll post some pics in a day or two ... or three or four ...
Sunday, April 20, 2008
Challenge completed
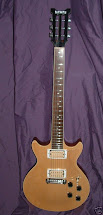
The deadline for completing the challenge was 12 noon on 20th April. And I made it, by about 90 mins - though only by getting into the workshop by 8am on a Sunday morning. Perhaps I was taking the challenge too seriously.
The other constraint for the challenge was to spend no more than £100. My total spend is around £75, so I'm more than happy with that.
Some pics ...


The other constraint for the challenge was to spend no more than £100. My total spend is around £75, so I'm more than happy with that.
Some pics ...


It's been great fun - and a real impetus to make me spend some time in the workshop. It's far from the best guitar in my collection (by any measure), but it's certainly the best guitar that I've built, with my own hands and tools, in my workshop, without any outside help.
It's also the first guitar that I've build with my own hands (etc) - but it won't be the last.
The next guitar will probably be another Tele, but this time a thinline. The body will definitely be cherry, and I might use cherry for the top as well, or I might use a maple cap that I've had sat here for a while ... and a cherry neck too perhaps?
I'll blog that build too ...
Tuesday, April 15, 2008
Nearly, nearly there
With a little help from some people more knowledgeable than me, I finally got the wiring sorted out this afternoon. A task that should have taken 30 minutes ended up taking me way too many hours, spread over a couple of days.
So, I strung the guitar and screwed everything in place, just to check that the guitar "worked" and felt reasonably OK.
A couple of quick pics, just to get an idea of how it looks ...


That's a one-piece Cherry body, with a maple neck & rosewood (I think) fretboard. Humbucker in the neck position, and a standard Tele-type single coil in the bridge.
There's still plenty of finishing off to do - get the string trees and strap locks fitted, sort out the action properly, get the control knobs on, maybe a quick fret dress, add another coat (or two, or three) of finishing oil ... but I've got until Sunday lunchtime to get it all done before the challenge ends, so that shouldn't be a major problem. Oh, and I should probably add a decent earth wire to the bridge too - this guitar is a little noisy and crackly when its plugged in ...
When all that's done, I'll take some better and more detailed pics to show it off properly.
I reckon it's cost me about £75 in parts & materials to build it. Not bad?
Now, what next ...
Monday, April 14, 2008
Getting there now ...
Firstly, for anyone reading this post-by-post, here's a pic of the body, with the thru-body string holes drilled, and widened so that the ferrules will fit properly. These look pretty straight and evenly spaced to my eye ... not bad for some freehand drilling!
 You can also see the effect of the oil on the body ... the top 3/4s has just had the first coat of oil applied, whereas the bottom is still oil-free. The oil is really bringing out the grain, and the different colours, of the wood. Looks good to me!
The neck for this build might actually qualify as an "eBay bargain" - 2 words that I really don't use together very often (as opposed to "eBay ripoff", "eBay scam" etc!). The neck cost me £5. It was as straight as a banana, and the back of the neck looked as if it had been sanded carefully with a rasp. A coarse rasp.
Some twiddling with the truss rod has more-or-less straightened the neck, although the frets still need some attention to level them properly. And an afternoon spent with some sandpaper and wirewool has removed pretty much all of the marks on the back of the neck. It's now straight, and smooth.
 To keep under the £100 budget, I'm re-using some old hardware that was salvaged from an old Tele-copy by a co-competitor. So it's second-hand, and second-dirty-hand. Some metal polish, some rags, an old toothbrush, and a couple of hours ... and the metalwork now shines. The pic below shows the 2 control knobs - 1 before, and 1 after the polishing work ...
 I took the machineheads and the bridge completely apart so that I could polish all of it - even though most of it isn't visible ... again, the pic below shows the pre/post condition of some of the components ...
 The plan now is to put another coat of oil on the body and the back of the neck, and then put the guitar together. I may get the controls soldered today, or that may be a job for tomorrow, just see how it goes.
Almost done!
Thursday, April 10, 2008
Bah
As this build is a fairly "traditional" Tele-type, the strings will go over the bridge and through the body (rather than being anchored behind the bridge).
That requires me to drill 6 holes through the body. That bit's easy, even for me. However, it gets a little more difficult because it looks a whole lot better if the holes line up in a nice straight line, and even spaced, when you look at the back of the body.
So I have to drill the holes perfectly vertically (in both planes) and perfectly equidistantly spaced. Suddenly, it's not looking quite so easy.
But, perhaps it's not a huge problem either as I have a drill press and I can use a ruler ...
So I thought. Unfortunately, the "throat" (is that the right word?) of the drill press was too small to be able to fit the body into ... so I couldn't use the drill press to drill the holes. Arrgghhh. Instead, I had to use an ordinary hand-held drill. Look out for the pics at the weekend to see how it went ...
More positively, I read a forum post about shaped Tele bodies. And I thought ... "why not?". When you've drunk as much Adnams as I have, you need a belly-carve. So, rather than being a fully traditional Tele-body, it's now going to be a "Tele with a belly" carved body ... far more practical and comfortable, though it means that all of the sanding I've done on that part of the body back is now completely wasted because I'm about to attack it with a rasp!
No update pics today, and probably no time for working on the guitar tomorrow ... but the weekend schedule says "guitar, guitar, guitar", so there should be a lot of good progress to report over the weekend. Which is lucky, because the challenge ends next weekend ...
Saturday, April 5, 2008
Money, money, money
Time to check the budget and see what I've got left to spend ...
Body - £15.
Neck - £5.
Control plate, pots, bridge, bridge p/up, machineheads - £15.
Neck p/up - £25.
String ferrules - £4.
String trees - £2.50
Neck plate & screws - £4.
Strap buttons - £2.
A total of just £72.50.
Which is a problem ... because it means that I haven't spent enough!! So, what should the balance of the budget be spent on? Ideas? Suggestions?
Friday, April 4, 2008
Starting to look like a guitar
A good couple of hours in the workshop this afternoon.
Most of the time was spent preparing more templates - they may save time in the long-term, but making template certainly takes a lot of time in the short-term! But I did then get to use them to prepare the control cavity, and the neck is now in place ...
If you look closely ...

... you can see that the control plate fits flush with the top of the body. Usually it would be fixed on top of the body, level with the scratchplate, but as I won't be using a scratchplate, I decided to recess the control plate into the body. I have a template, and I'm going to use it ...

The neck will be screwed to the body, but I didn't see that as any reason to have a loose fit ...


Still plenty of work to do on shaping the heel and blending the join in "properly". I've also got to refinish the whole neck as the back is "rough" and the frets need a lot of attention.
But, looks like progress to me :)
Wednesday, April 2, 2008
Progress
Believe it or not, it took me about 3-4 hours to create those couple of cavities in the body.
 I should have known that it wasn't going to be a simple day when I switched my iPod on to see that it had about 5mins charge left. After charging it overnight. I've lost count of the number of new batteries that I've put in the thing.
Being very aware of the power of the Router, particularly its power to destroy pieces of wood in unforeseen, unexpected and undesired ways, I've admit to a little hesitancy in creating the cavities. So I spent the first hour or two preparing a decent mdf template for the neck pocket and the pick-up cavities. That might seem a little OTT for building one guitar, but I'm hoping to build a few Teles, so I'm looking on it as an investment.
Stick the template to the body, nicely aligned on the centre lines, and then clamp it for some extra stability. Take the router down in 5mm steps to create some nice clean cavities. All good so far.
Unclamp the body, and gently prise the template off the body. OK, try again, not so gently. Right, still no movement, so try again but really pulling it this time. Still nothing. The double sided tape has become supertape with the adhesion properties of Spiderman in his special extra-sticky suit. I ended up using a chisel (carefully) between the edge of the template and the body and levering it off. Unfortunately, some of the supertape remained stuck to the body (with bits of the mdf template) so I needed to scrape them off with a blade. And then remove the chisel marks with more sandpaper.
So a simple job took 3-4 hours. I bet the professionals don't have these problems ...
But, it's looking good, and I have returned undefeated (apart from a slight indentation in my finger which is leaking red stuff ... note to self ... remember that chisels are sharp and can damage skin).
Next, rout out the control cavity and find a long (very long) drill bit for the pick-up wire channels ...
Subscribe to:
Posts (Atom)